Track and dolly for time lapse Our rotary table can be used with the Time Machine to rotate a camera a tiny amount between each exposure to result in circular pans of a time lapse scene. It's not difficult to adapt the rotary table to a track and dolly for linear pans as well. The system I describe here can be built in a day for less than $75 in parts. (A lightweight monorail track and dolly can also be built.) A more professional implementation of this "skateboard wheel" dolly design was used by Tom Lowe to make several of his stunning time lapse videos. He posted a video of his Time Machine dolly rig on YouTube:
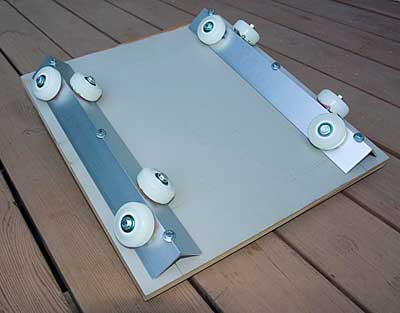
Click here to see a movie of the dolly in motion. Click here to see a movie made with the dolly. Click here to see a movie made with two rotary tables. One pulls the dolly while a second rotary table on the dolly performs a ramped pan at the same time. Both rotary tables are driven by one Time Machine. Construction of the track and dolly is easy. My dolly board is about 18" square. Cut two lengths of aluminum angle stock a little shorter than the dolly. The angle should be about 2" on a side and at least 1/8" thick. I used eight wheels with ball bearings for inline skates that I bought for $30 at a local sporting goods store (Senate Sinner series 55 mm 88A). The wheels are bolted to the angle stock which is bolted to the dolly. The wheels need to extend a little bit beyond the edge of the angle bar. Let the bolt ends extend about an inch above the top of the dolly. If you plan the width of your track to be narrower than the width of an aluminum extension ladder, you can rest the PVC track on top of a ladder to raise it above irregular ground. My track width was 13".
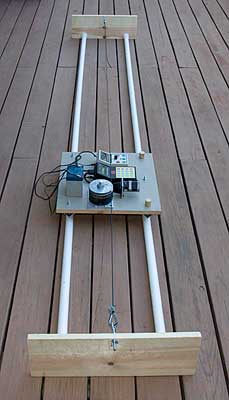
The end panels of the track (see below) are two 1 x 8 boards somewhat wider than the spacing of your wheels. Screw end caps for the PVC pipe to the bottom of the two boards at the correct spacing. Slip the pipe into the end caps and you have a track. The dolly should now roll very freely on it. The rotary table is screwed to the top of the dolly. A four inch pulley for a v-belt is bolted to the rotary table.
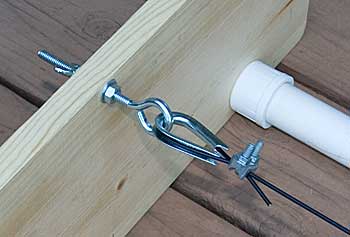
You need to run a cable from one end of the track to the other. I used vinyl coated 1/16" steel aircraft cable. It's fastened to each end panel with a long eye bolt and wing nut so you can tighten it up easily. (The eyebolts need to be mounted at the same height as the center of the pulley on the rotary table.) The aircraft cable is wrapped around the pulley once and then secured at each end of the track. With just a little bit of tension on the cable, the dolly will move along the track as the rotary table turns. With a four inch pulley, each degree of the rotary table moves the dolly .035 inches. The photo below shows a closed loop at the end of the cable. If you use an s-hook or spring clip instead it will be easier to remove the cable quickly.
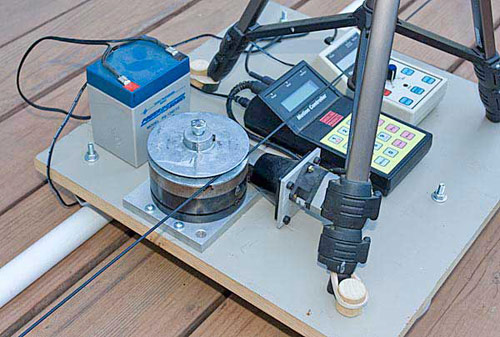
In the picture below, the Motion Controller, Time Machine, and a rechargeable battery are sitting next to the rotary table. We have used a couple of different motor styles on the rotary table. Your motor may not resemble the one in the picture. Notice how the legs of the tripod are secured with rubber bands to a short length of wooden dowel drilled to slip over the bolt that holds the angle bar to the bottom of the dolly.
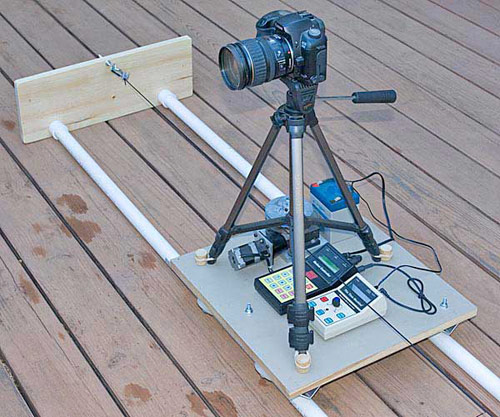
This picture shows the complete setup.
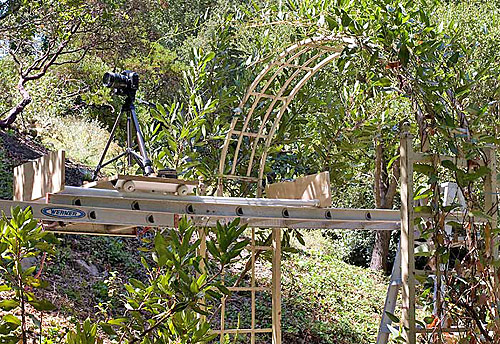
This picture illustrates a short track and dolly resting on an extension ladder raised over irregular ground.
|
 Simple homemade track and dolly